
Wednesday, January 25, 2012
Office 2010 beta download
It has been a few weeks since, Office 2010 beta version is available for download. Microsoft is collecting feedback from these early beta version users to fix bugs and enhance various features. If you are interested in trying out the new Office 2010 beta version you can download from http://www.microsoft.com/office/2010/en/default.aspx
The download size is around 684MB (32 bit) and 750MB(64bit) version. If you would like to download and try it then it is advisible to try in a computer that is not your primary computer. It is better to try in a computer that does not store important data.
The download size is around 684MB (32 bit) and 750MB(64bit) version. If you would like to download and try it then it is advisible to try in a computer that is not your primary computer. It is better to try in a computer that does not store important data.
VLC

Media files both audio and video files are available in the internet. The problem with these files is that there are many different file formats. VLC is a program that can convert video and audio files that are suitable for your IPod and IPod Touch and IPhone. VLC can also convert and split CD and DVDs into smaller files. You can download from http://www.videolan.org/vlc/.
VLC is capable of reading most audio and video formats (MPEG-2, MPEG-4, H.264, DivX, MPEG-1, mp3, ogg, aac …) as well as DVDs, Audio CDs VCDs, and various streaming protocols.
Free Video Cutter

Have you ever wondered how to cut and and extract a portion of the video from a large video file, CD, DVD and other video formats. Video Cutter software allows you to do just that.
Free Video Cutter is a free video utility to help you to cut and split your video files into small size you can use it as a "video cutter", "video splitter" or "video clipper". Program can work with most video formats, such as MPEG 1/2, MPEG4, DivX, Xvid, AVI, WMV, Quicktime MOV, Flash video and more, the output video can have a good video quality.
You dont have to have any professional IT stills, knowledge about all kinds of video formats, it is so easy to use.
Some shortcut keys in Excel
Ctrl+Shift+O: To select all the cells with comments. If there are no cells with contents then you will get ‘No cells found’ message.
Ctrl+[ : To show which are the related cells in the selected formula.
Ctrl+] : To show the related formulas of the selected cell.
Shift+Arrow key : The selection will be extended to one more adjacent cell.
Ctrl+Shift+Arrow key : The selection will be extended to the last cell with data either horizontally or vertically based on your current selection.
Shift+Home : The selection will be extended to the first cell horizontally.
Ctrl+Shift+Home : Selection will be extended to the first cell in the worksheet.
Ctrl+Shift+End: Selection will be extended until the last cell in the worksheet/.
Enter: Cursor will be moved to the next cell below the current cell.
TouchFreeze – Activate, Freeze touch pad automatically in your laptop
For those who have been working on a desktop computer for a long time and switched to laptops, the major problem is getting adjusted with the smaller keyboard. Another problem is when typing on the laptop keyboard, the thumb sometimes touches the keypad and the cursor moves to another space.
This problem usually goes away with experience. More experienced laptop users do not face this issue, as they get adjusted to the new keyboard layout over time.
However, TouchFreeze is a free utility that can be used to freeze and activate touch pad automatically. If TouchFreeze is installed, it automatically freezes the touchpad and when you stop typing, it will automatically enable the touch pad again. To download TouchFreeze goto http://code.google.com/p/touchfreeze/downloads/list
Easy Duplicate Binder
While working with computer files we take copies of them and use them. But most of the times we forget to delete duplicate copies. Sometimes we save the file in the desktop or temp folders and backup folders. So multiple copies of the same file exists in the hard disk. This takes up hard disk space.
Only when we reach the hard disk space limit we realize this. But it will be too late to find the duplicate files. Fortunately there are some utilities available that can find duplicate files automatically and remove them. “Easy Duplicate Finder” is one such useful utility available from the internet.
You can find the file to download at http://www.easyduplicatefinder.com. This program does not affect system files and folders. Then it will show you a list of duplicate files and let you decide which ones to delete.
New features in Open Office
Open Office is an open source software that resembles Microsoft Office in terms of features. As it is open source, tons of volunteer programmers worldwide improve and add features to it continuously. Some of the new features in Open Office are:
- Ribbon Style Interface: When Microsoft introduced ribbon style interface in its Office suite of applications, it was a bit difficult to get adjusted to it. However, it has proved to be easy to use and has improved user experience. Hence, the same interface type is now available in Open Office as well. This is called Ribbon Style Interface 3.3
- Thesaurus on right click: Open Office now includes a context menu that gives useful utilities on right click such as Thesaurus.
- Find Bar: A Find bar has been included which enables easy searching especially in a large document.
- Calc Sheet Tabs in different colors: This may seem as a simple feature. But when you implement this and use this in a calc spreadsheet you will know the real use.
- Some of the other features are distributed SCM, SVG, Importer, Flash Animation, More fonts, templates, Clip arts, builders and much more.
Shortcut function keys in excel
- F1: Opens a help task pane
- F1 + Ctrl: Opens or closes the help window
- F2: To edit the text in the active cell
- F2 + Shift: To write a comment in the active cell
- F2 + Alt: Opens the save as dialog box
- F3 + Shift: opens the insert dialog box
- F3 + Ctrl: Opens the define name dialog box
- F3 + Shift + Ctrl: Opens the create name dialog box
- F4: To redo the last command
- F4 + Ctrl: To close the workbook window
- F4 + Alt: To close the excel program
- F5: Opens the Goto dialog box
- F5 + Ctrl: brings back to the first level of workbook
- F6: To shift between help taskbar and the excel window
- F6 + Shift: To goto the previous square in the open worksheet
- F6 + Ctrl: If more than one workbook is open to switch between them
- F7: To open spelling correction window
- F7 + Ctrl: When workbook window is not maximised it will move the window
- F8: To activate / deactivate extended mode
- F9: Will calculate all the worksheets in all open workbooks
- F9 + Shift: Will calculate the active worksheet
- F9 + Ctrl: To Minimise the workbook window
- F10: Will select the menu bar
- F10 + Ctrl: To open minimised window
- F11: Will create a chart using the current range
- F11 + Shift: To select a new worksheet
- F11 + Alt: To switch between visual basic editor and the worksheet
- F11 + Alt + Shift: Opens microsoft script editor
- F12: Opens save as dialog box
- F12 + Shift: Saves the active workbook
- F12 + Ctrl: To open the Open dialog box
- F12 + Ctrl + Shift: Opens the print dialog box
SOLVED : "WINDOWS CAN'T FIND NULL" error message
This issue can be caused by any of the following possibilities.
1. Hard disk drive is short on available disk space.
2. Several software programs have been installed/uninstalled leaving behind bad files and/or confusing the software.
3. Data Corruption.
4. Computer is overheating.
5. Bad Hardware.
Below are steps for Microsoft Windows that should help speed up the computer or determine why the computer is running slow.
1. If you have a hard disk drive that is 2GB or smaller, ensure that there is at least 200MB of hard disk drive space free. If you have a hard drive larger than this size, verify that there is at least 500MB of free hard disk space. This available space allows the computer to have room for the swap file to increase in size as well as room for temporary files.
2. Run Scandisk or something equivalent to help ensure that there is nothing physically wrong with the computer hard disk drive.
3. Run Defrag to help ensure that data is arranged in the best possible order.
4. Remove or disable any or programs that automatically start each time the computer boots.
5. Verify that the device manager has no conflicts, but if conflicts are present, resolve them.
6. If you have Windows XP try deleting all files in the prefetch directory. These are prefetch files and can lower system resources if loading programs no longer being used.
7. Try running through the basic troubleshooting steps for your operating system.
8. Make sure your computer and processor is not overheating, excessive heat can cause a significant decrease in computer performance some processors will even lower the speed of the processor automatically to help compensate for the heat related issues.
9. Finally, if none of the above solutions resolve your issues, it is recommended that you either reinstall Windows or erase everything and then start over.
Windows 7 Tips and Tricks
Windows 7 is much better than the latest version of Windows Vista and it comes with a lot of new features. Unfortunately, some of them aren’t so easy to figure out, so I created a list of the most important tips and tricks and a step-by-step guide that will help you apply all of these great tips and tricks.
To use PC Safeguard, go to Control Panel -> User Accounts and create a new account, then select “Set Up Pc Safeguard” and switch it on. Then you can stay relaxed when others use your computer, because you won’t find anything changed, including configurations, downloaded software, installed programs.
You can simply do this by pressing the Windows key then typing Gpedit.msc. Then go to Computer Navigation -> Windows Settings -> Security Settings -> Application Control Policies -> AppLocker. Right click on one of the options (Executables, Installers, or Script) and create a new rule. That should save you from a lot of headaches.
6.1 Dock The Current Windows To The Right Side Of The Screen
Press the Windows key + Right key to dock it to the right side of the screen.
8. Display Gadgets On Top Of Other Windows
Press ALT + G
Right click on the desktop then go to Personalize -> Desktop Background and hold the CTRL key while choosing the images. Then you can choose the time intervals between images and opt to display them randomly or in a row.
14. Minimize The Active Window
Press Windows Key + Down Key
Right click the taskbar, go to Toolbar -> New Toolbar and type “%UserProfile%\AppData\Roaming\Microsoft\Internet Explorer\Quick Launch” into the folder box, then click Select Folder.
To make it look like it would in Windows Vista, right click the taskbar, uncheck “Lock the Taskbar”, then right click the divider and uncheck “Show Title” and “Show Text”. Then right click the taskbar and check “Show Small Icons” and you should be done.
Press the Windows Key and type “POWERCFG –ENERGY –OUTPUT ”, and it will create a file called energy-report.html in the folder specified by you, after observing your PC for 60 seconds.
For instance, go to http://www.istartedsomething.com/flickrsearch/ and download the Flickr connector. After that, you should see the Flickr Search in your searches folder and you will be able to do it directly from your desktop, without needing to visit their website.
Right click the Start button, then go to Properties -> Start Menu -> Customize and set the Videos to “Display as a link” and you’re done, you will now find them in the Start Menu.
All you have to do is press the Windows Key + Shift Key + Left or Right Key, depending on what monitor you want to move it to.
Right click the Start Button, go to Properties and choose the ‘Power Boot Action” to do whatever you want, from the given options.
To access it, go to Control Panel -> System And Security -> Action Center.
There are a lot of options, guidance and information available there, so give it a try by typing “troubleshoot” or “fix” after pressing the Windows Key.
This can be done in Windows 7 by double clicking the Notification Area Icons in Control panel. There you can change notifications and icons for the Action Center, Network, Volume, Windows Explorer, Media Center Tray Applet, Windows Update Automatic Updates.
Press the Windows Logo Key, type “regedit”, go to HKEY_CURRENT_USER\Control Panel\Desktop and set WindowArrangementActive to 0. After you reboot your system the smart arrangements will be turned off.
To do this, hold down Shift button, right-click the drive and “Open in New Process”. Now you will be safe.
To change it to My Computer, press the Windows Key, then type “explorer”, select Properties and in the Shortcut tab type “%SystemRoot%\explorer.exe /root,::{20D04FE0-3AEA-1069-A2D8-08002B30309D}”. Now you have to right-click the Explorer icon in the Taskbar and hit “Unpin this program from the taskbar” and then drag it back from the Start Menu.
Press the Windows Key, type ‘regedit’, go to HKEY_LOCAL_MACHINE\SOFTWARE\Microsoft\Windows\CurrentVersion\Sidebar\Settings and create a DWORD value named AllowElevatedProcess and set its value to 1. Now you should be able to use your gadgets. If not, then reboot your PC and you should be done.
Both Windows Media Player and Windows Media Center come with a bug that can damage your MP3s by filling missing metadata automatically on imported MP3 files. This can cut a few seconds from the beginning of the tracks and can prove really disturbing. This problem was fixed by Microsoft using the fix that you can download here.
Though it is not recommended, because it’s much slower than normal search, you can give it a try by doing the following: Launch Windows Explorer, go to Tools -> Folder Options -> View and check “Try to search the content of unknown file types”. If you don’t need it anymore, don’t forget to clear it for an increase in speed.
Press the Windows Key, type “gpedit.msc”, then go to User Configuration -> Administrative Templates -> Windows Components -> Windows Explorer and double click on “Turn off display of recent search entries”.
To do it, press the Windows Key and then type “CMD”.
You can defragment your hard disk from the command line by typing “defrag” and you have the following options: “/r” will defrag multiple drives simultaneously, “-a” performs a defrag analysis, “-v” prints the report, “-r” treats files with at least 64 Mb of fragments like are not fragmented, “-w” will defrag everything. An example is “defrag C: -v -w” to defrag the whole drive C.
The easier one is to press the Windows Key, (or click Start), in the search box, type MSCONFIG.EXE, click the Startup tab and clear the Sidebar box. The hard way is to press the Windows key, type “regedit”, find and delete the registry key at HKEY_CURRENT_USER\Software\Microsoft\Windows\CurrentVersion\Run. This can save you some RAM consumed with no use.
To attach the virtual disk file, press the Windows Key, right-click Computer, then go to Manage -> Disk Management -> Action -> Attach VHD and you have to specify the location and if it’s read only or not.
To initialize a virtual hard disk, press the Windows Key, right-click on Computer, go to Manage -> Disk Management -> Action -> Attach VHD, specify the location, click Ok, then right click on the virtual disk and click on Initialize Disk. Select the partition style you want to use and then right-click on the unallocated space and click “New Simple Volume” and follow the instructions wizard. Now, a new hard drive appears in Windows Explorer and you can use it as a real partition.
Simply create a new shortcut to C:\Windows\System32\rundll32.exe user32.dll, LockWorkStation and place it wherever you want.
Right-click an open area in Start Menu, go to Properties -> Start Menu -> Customize and check “Run Command”. Now you should be done.
Press the Windows Key, right-click on Computer, go to Properties -> Advanced System Settings -> Performance -> Settings and clear “Animate windows when minimizing and maximizing”. Click OK to finnish.
Press the Windows Key, click your username and double-click on the folder you wish to change. Then you will see Includes: 2 library locations. Click on that text, right-click on the folder you wish to set like default and click “Set as default file location”, then click Ok.
To do this, press the Windows Key, type “command”, right-click on Command Prompt and hit “Run as administrator”, then type “unregmp2.exe /SwapTo:64?”. After that, press the Windows Key, type “regedit”, go to HKLM\Software\Microsoft\Windows\CurrentVersion\App Paths\wmplayer.exe\, double click on value and change “%ProgramFiles(x86)” to “%ProgramFiles%”. Now you should be using the 64bit Windows Media Player.
Unpin Windows Explorer from the Taskbar, then press the Windows Key, go to Accessories, right-click Windows Explorer, go to Properties and change the shortcut path to %SystemRoot%\explorer.exe /root,::{20D04FE0-3AEA-1069-A2D8-08002B30309D} ( if you want it to default to My Computer ) or %SystemRoot%\explorer.exe /root,::{031E4825-7B94-4dc3-B131-E946B44C8DD5} ( if you want it to default to Libraries ). Now repin Windows Explorer to your Taskbar and you’re done.
All that is required for opening more instances of it is just a click of the middle mouse button. If you aren’t pleased with what you’ve done, change the shortcut path back to %SystemRoot%\explorer.exe.
That’s it! There you go – 70 very useful tips and tricks for Microsoft Windows 7. Maybe you knew some of these but I’m sure there are some that you did not heard of. They can prove very useful and can save you a lot of time while using Windows 7.
I’m sure you’re asking yourself where’s the tip number 70? Ok, the tip or advice that will help you work faster and more efficiently, with less frustration is…
1. PC Safeguard
I rarely let anyone use my PC because I’m afraid he will mess it up, but it seems Microsoft has been thinking at me and came with a solution. The PC Safeguard doesn’t let anyone mess your PC settings, because after the user logs off, the configurations are reset back to normal. Of course it will not restore the configurations changed by you, but only the ones done by other users you define.To use PC Safeguard, go to Control Panel -> User Accounts and create a new account, then select “Set Up Pc Safeguard” and switch it on. Then you can stay relaxed when others use your computer, because you won’t find anything changed, including configurations, downloaded software, installed programs.
2. Screen Calibration
Fortunately, Windows 7 comes with a display calibration wizard that lets you set up the screen brightness properly, so you won’t have any problems viewing photos or text. The problem was that on one PC a photo could look sharp and bright and on another it looks awful. Now the problem can be fixed by pressing the Windows logo key and then typing “DCCW”.3. AppLocker
If you are usually sharing your computer with someone else, then you might want to restrict their access to your applications, files or documents. Using the AppLocker tool, you have a few options to do this by blocking other users to access Executables, Windows Installers, Scripts, a specific publisher or path.You can simply do this by pressing the Windows key then typing Gpedit.msc. Then go to Computer Navigation -> Windows Settings -> Security Settings -> Application Control Policies -> AppLocker. Right click on one of the options (Executables, Installers, or Script) and create a new rule. That should save you from a lot of headaches.
4. Burn Images
We all had trouble with image burning in Windows, because it couldn’t do it itself, a standalone software being needed. With Windows 7 this will not be a problem anymore. All you have to do is double-click the ISO image and burn it on the CD or DVD that’s inserted in the drive.5. Display Empty Removable Drives
Windows 7 will not show empty drives by default, so if you connect an empty drive to your PC, don’t worry, just go to Tools -> Folder Options -> View and uncheck “Hide empty drives in the computer folder”. This doesn’t seem like a good idea and it should not be default setting, because it will be hard for inexperienced users to figure it out. I bet a lot of users will return their newly bought drive thinking it’s broken.6. Dock The Current Windows To The Left Side Of The Screen
This new feature seems useful because sometimes it’s disturbing that windows seems to float like crazy on the screen and it’s hard to attach them to one side of it. Now this can easily be done using a keyboard shortcut. Press the Windows key + Left key (arrow) to dock it to the left side of the screen.6.1 Dock The Current Windows To The Right Side Of The Screen
Press the Windows key + Right key to dock it to the right side of the screen.
7. Display Or Hide The Explorer Preview Panel
Press ALT + P to hide it then once again to display it.8. Display Gadgets On Top Of Other Windows
Press ALT + G
9. Background Photo Slideshow
If you are like me, lazy and bored, then you will want to change the background from time to time, wasting a lot of time. Now you don’t have to do this anymore, because you can set up a slideshow.Right click on the desktop then go to Personalize -> Desktop Background and hold the CTRL key while choosing the images. Then you can choose the time intervals between images and opt to display them randomly or in a row.
10. Make The Taskbar Smaller
If you feel like the taskbar is using too much of your screen space, you can choose to make the icons smaller. To do this, right-click on the Start button, then go to Properties -> Taskbar and set it to “Use small icons”11. Combine Taskbar Icons
When you have more windows or applications opened, the taskbar’s space might not be enough for them all, so you need to combine them, just like you would in Windows XP or Vista. To do this, right-click the Start button, then go to Properties -> Taskbar and check “Combine when taskbar is full”.12. Multi-threaded File Copy
If you are a more advanced user, you’ve heard already about Robocopy. Now it’s included in Windows 7 and lets you perform multi-threaded copies from the command line. You can choose the number of threads like this “/MT[:n], which can be from 1 to 128.13. Maximize Or Restore The Foreground Window
Press Windows Key + Up Key.14. Minimize The Active Window
Press Windows Key + Down Key
15. Activate The Quick Launch Toolbar
The Quick Launch Toolbar in Windows XP and in Vista seems a very good idea that you might miss when using Windows 7. Fortunately though, you can get it back in a quick few steps.Right click the taskbar, go to Toolbar -> New Toolbar and type “%UserProfile%\AppData\Roaming\Microsoft\Internet Explorer\Quick Launch” into the folder box, then click Select Folder.
To make it look like it would in Windows Vista, right click the taskbar, uncheck “Lock the Taskbar”, then right click the divider and uncheck “Show Title” and “Show Text”. Then right click the taskbar and check “Show Small Icons” and you should be done.
16. Preview Photos In Windows Explorer
While in Windows Explorer, Press ALT + P and a preview should appear on the right.17. Desktop Magnifier
Press the Windows Key and the Plus Key to zoom in or Windows Key and the Minus Key to zoom out. You can zoom anywhere on the desktop and you can even configure your magnifier. You can choose to invert colors, follow the mouse pointer, follow the keyboard focus, or the text insertion point.18. Minimize Everything Except The Current Window
Press the Windows Key + Home Key.19. TroubleShoot Power Management
Windows 7 can tell you how much power your system uses or provide detailed information about the power usage and issues caused by each application and device. This way you can optimize the way your battery is used, making It last longer.Press the Windows Key and type “POWERCFG –ENERGY –OUTPUT ”, and it will create a file called energy-report.html in the folder specified by you, after observing your PC for 60 seconds.
20. Web Searches From Your Desktop
Windows 7 lets you search for online resources, by adding a connector that be downloaded for free.For instance, go to http://www.istartedsomething.com/flickrsearch/ and download the Flickr connector. After that, you should see the Flickr Search in your searches folder and you will be able to do it directly from your desktop, without needing to visit their website.
21. Add Videos To Your Start Menu
If you were looking for a faster way to access your videos, then Windows 7 has the right answer for you.Right click the Start button, then go to Properties -> Start Menu -> Customize and set the Videos to “Display as a link” and you’re done, you will now find them in the Start Menu.
22. Shift The Window From One Monitor To Another
If you are using two or more monitors, then you might want to move the Windows from one to another. There is a very simple way to do it.All you have to do is press the Windows Key + Shift Key + Left or Right Key, depending on what monitor you want to move it to.
23. Custom Power Button
There is an option to replace the “Shut Down” button with another action, if you rarely shut down the computer, but you more often restart it or put it on sleep.Right click the Start Button, go to Properties and choose the ‘Power Boot Action” to do whatever you want, from the given options.
24. Easily Add A New Font
Adding a new font it’s now easier than ever. Just download the font you want, double click it and you should see the install button.25. Stretch The Window Vertically
You can stretch the active window vertically to the maximum display height by pressing the Windows + Shift + Up (arrow) keys. Press Windows + Down Keys if you want to restore it.26. Open Windows Explorer
Press the Windows logo key + E to open a new instance of Windows Explorer.27. Create A New Instance Of The First Icon In The Taskbar
Press Windows + 1 Keys to open a new instance of the first icon in the taskbar. This could prove really useful in some circumstances.28. Windows Action Center
Windows Action Center offers you important information about your PC, like the Antivirus Status, updates, troubleshooting and provides a backup scheduling feature.To access it, go to Control Panel -> System And Security -> Action Center.
29. Windows Troubleshooting Platform
This platform can help you solve a lot of issues you may encounter, like the internet connection, hardware devices, poor system performance and more. You can choose what to troubleshoot and it will come with some possible explanations for the problem that might really help you.There are a lot of options, guidance and information available there, so give it a try by typing “troubleshoot” or “fix” after pressing the Windows Key.
30. Turn Off System Notifications
System notifications are usually disturbing and aren’t always useful, so you might want to turn some of them off and.This can be done in Windows 7 by double clicking the Notification Area Icons in Control panel. There you can change notifications and icons for the Action Center, Network, Volume, Windows Explorer, Media Center Tray Applet, Windows Update Automatic Updates.
31. Turn Off Security Messages
To turn off security messages you have to go to Control Panel -> System and Security -> Action Center -> Change Action Center Settings and you can turn off the following notifications: Windows Update, Internet Security Settings, Network Firewall, Spyware and related protection, User Account Control, Virus Protection, Windows Backup, Windows Troubleshooting, Check for updates.32. Cycle Through The Open Programs Via The Taskbar’s Peek Menu
This works just like Alt + Tab, but opens the menu just above the sidebar, doesn’t seem very useful. Give it a try by pressing The Windows Key + T.33. Run A Program As An Administrator
You can easily run a program as an administrator by pressing Ctrl + Shift while opening it.34. Same Program Windows Switching
If you have more instances of a program running, simply hold Ctrl while clicking on its icon and it will cycle through all the instances.35. Auto Arrange Desktop Icons
You can now forget about the Right Click -> Auto arrange. All you have to do is hold F5 pressed for a bit and the icons will auto arrange.36. Encrypt Removable USB Drives
Encrypting an USB drive has never been easier. Now you can right click on the removable drive and then on the “Turn on Bitlocker”.37. Turn Off Smart Window Arrangement
If you don’t like Windows 7’s new features that arrange your windows intelligently, there’s an easy way to turn it off.Press the Windows Logo Key, type “regedit”, go to HKEY_CURRENT_USER\Control Panel\Desktop and set WindowArrangementActive to 0. After you reboot your system the smart arrangements will be turned off.
38. Create A System Repair Disc
Windows 7 features a tool that lets you create a bootable System Repair Disc that includes some system tools and the command prompt. To create it, press the Windows Key and type “system repair disc”.39. Hard-Link Migration Store
The Hard-Link Migration store is only available for new computers and can migrate files, settings, and user accounts. The new Hard-Link Migration Store uses more less disk space and takes less time.40. Turn Off ‘Send Feedback’
If for some reason, you’re still using the Beta version of Windows 7 and if you feel disturbed by “Send Feedback button”, there is a way to turn it off. Press the Windows Key and type ‘regedit’, then go to HKEY_CURRENT_USER\Control Panel\Desktop and set FeedbackToolEnabled to 0. After you restart the computer, it shouldn’t be there anymore. Also, if you want to turn it on again, set the FeedbackToolEnabled to 3.41. Improved Calculator
Windows 7 features an improved calculator that can do unit conversion, date calculation, gas mileage, lease, and mortgage. Also you can choose between Standard, Scientific, Programmer, and Statistic calculator.42. Open A Folder In A New Process
Windows 7 opens all folders in the same process in order to save resources, but this means if one folder crashes, they all crash. So if you feel like that’s a risk you don’t have to take, then you have to open them all in their own processes.To do this, hold down Shift button, right-click the drive and “Open in New Process”. Now you will be safe.
43. Problem Step Recorder
The Problem Step Recorder is a great tool that can be used in many circumstances. You can turn it on by pressing the Windows Key, then typing “PSR.exe” and click Record. Now it will record all your moves and save them as a HTML document that you can view or write descriptions to it. This can help you with troubleshooting or when writing a guidance or tutorial.44. Free Codecs Pack
Unfortunately, Windows Media Player still isn’t able to play many audio and video files, so you will still need some codecs. But with the free codecs pack you can download here you shouldn’t have any problems.45. Start Windows Explorer From My Computer
Windows Explorer opens in the Libraries directory by default. Most of us are used to see the My Computer page instead.To change it to My Computer, press the Windows Key, then type “explorer”, select Properties and in the Shortcut tab type “%SystemRoot%\explorer.exe /root,::{20D04FE0-3AEA-1069-A2D8-08002B30309D}”. Now you have to right-click the Explorer icon in the Taskbar and hit “Unpin this program from the taskbar” and then drag it back from the Start Menu.
46. Clear The Desktop
If there are too many windows on the desktop, you can clear it by shaking a window from left to right and all others will minimize. To restore the other windows you have to shake the active one again.47. Use Gadgets With UAC Turned Off
Maybe you noticed that once you turn off UAC you can’t use the gadgets anymore, as a security measure. But if you want to risk using them, there a simple way to do it, even with UAC turned off.Press the Windows Key, type ‘regedit’, go to HKEY_LOCAL_MACHINE\SOFTWARE\Microsoft\Windows\CurrentVersion\Sidebar\Settings and create a DWORD value named AllowElevatedProcess and set its value to 1. Now you should be able to use your gadgets. If not, then reboot your PC and you should be done.
48. Fix The Media Player & Media Center MP3 Bug
If you have the final version of Windows 7, then go ahead and skip this one, since it applies only to Beta and RC versions.Both Windows Media Player and Windows Media Center come with a bug that can damage your MP3s by filling missing metadata automatically on imported MP3 files. This can cut a few seconds from the beginning of the tracks and can prove really disturbing. This problem was fixed by Microsoft using the fix that you can download here.
49. Search Everything In Your Computer
Windows 7 offers the possibility to search all file types, including unknown ones and this could help you in some cases.Though it is not recommended, because it’s much slower than normal search, you can give it a try by doing the following: Launch Windows Explorer, go to Tools -> Folder Options -> View and check “Try to search the content of unknown file types”. If you don’t need it anymore, don’t forget to clear it for an increase in speed.
50. Mouse Gestures
Windows 7 has not only brought gestures for those who use touchscreen devices, but for mouse users too. So, instead of right-clicking a Taskbar icon to access the jump list, you can hold left-click and drag upwards to smoothly call it up. In addition, clicking and dragging down the address bar in Internet Explorer will open the browsing history. There might be more gestures yet not discovered.51. Configure Your Music Favorites
The Windows Media Center creates a list of favorite songs based on how often you play them, your ratings and date you’ve added them. If you aren’t comfortable with the way they thought it out, change the way it sorts your favorites by going to Tasks -> Settings -> Music -> Favorite Music.52. Turn Off Recent Search Queries Display
Windows 7 holds and displays the recent search queries by default. This can often prove to be irritating. No need to stress though because it can be disabled.Press the Windows Key, type “gpedit.msc”, then go to User Configuration -> Administrative Templates -> Windows Components -> Windows Explorer and double click on “Turn off display of recent search entries”.
53. Advanced Disk Defragmentation
Fortunately, Windows 7 offers much better defragmentation than Vista and also lets you configure it a bit from the command line.To do it, press the Windows Key and then type “CMD”.
You can defragment your hard disk from the command line by typing “defrag” and you have the following options: “/r” will defrag multiple drives simultaneously, “-a” performs a defrag analysis, “-v” prints the report, “-r” treats files with at least 64 Mb of fragments like are not fragmented, “-w” will defrag everything. An example is “defrag C: -v -w” to defrag the whole drive C.
54. How To Make Internet Explorer 8 Load Faster
If you want Internet Explorer 8 to load faster, you need to disable the add-ons that slow it down, so go to Tools -> Manage Add-ons and check the load time for each one. You can choose for yourself the ones you can live without and ones that would increase the load speed.55. Media Center Automatic Download
Windows Media Center 12 allows you to schedule data downloads, so it can be done without disturbing you. To do it, go to Tasks -> Settings -> General -> Automatic Download Options and you can configure it to start and stop the download whenever you want.56. Remove The Sidebar
Windows 7 doesn’t seem to feature the sidebar anymore, but it still exists and runs in the background, being launched automatically at startup. So if you want to get rid of it, there are two ways.The easier one is to press the Windows Key, (or click Start), in the search box, type MSCONFIG.EXE, click the Startup tab and clear the Sidebar box. The hard way is to press the Windows key, type “regedit”, find and delete the registry key at HKEY_CURRENT_USER\Software\Microsoft\Windows\CurrentVersion\Run. This can save you some RAM consumed with no use.
57. Volume Tweaking
Don’t you like that Windows 7 automatically reduces the volume when it detects PC calls? You can turn off this feature by right-clicking the speaker icon in the taskbar, go to Sounds -> Communications and get rid of it.58. Run A Program As Another User
Windows 7 comes with the possibility to run a program both as an administrator or another user, by right clicking on the executable or shortcut while holding down the Shift key. Then you have to select “Run as another user”.59. How To Use Virtual Hard Disk Files
You can now create and manage virtual hard disks files in Windows 7 as if they were real disks. This can allow you to use a live Windows installation on the virtual disk without the need to boot the virtual Computer. To create a virtual disk you have to press the Windows Key, right-click on Computer, then go to Manage -> Disk Management -> Action -> Create VHD. There you can specify the location and size of your virtual hard disk file.To attach the virtual disk file, press the Windows Key, right-click Computer, then go to Manage -> Disk Management -> Action -> Attach VHD and you have to specify the location and if it’s read only or not.
To initialize a virtual hard disk, press the Windows Key, right-click on Computer, go to Manage -> Disk Management -> Action -> Attach VHD, specify the location, click Ok, then right click on the virtual disk and click on Initialize Disk. Select the partition style you want to use and then right-click on the unallocated space and click “New Simple Volume” and follow the instructions wizard. Now, a new hard drive appears in Windows Explorer and you can use it as a real partition.
60. Remove The Windows Live Messenger Tab In The Taskbar
To get rid of the Windows Live Messenger Tab and put it back in the system tray, where it belongs, go to C:\Program Files\Windows Live\Messenger, right-click msnmsdgr.exe and set its compatibility mode to Windows Vista.61. Lock The Screen
There is no Lock Screen button in the Start Menu anymore, so you have to press the Windows Key + L to lock it, now. It seems easier, in case you don’t forget the shortkey.62. Create A Screen Lock Shortcut
In case you don’t like shortkeys or you keep forgetting them, there’s another option for screen lock.Simply create a new shortcut to C:\Windows\System32\rundll32.exe user32.dll, LockWorkStation and place it wherever you want.
63. Enable Run Command In Start Menu
If you miss the old Run Command button in XP, then there’s an option to get it back in Windows 7.Right-click an open area in Start Menu, go to Properties -> Start Menu -> Customize and check “Run Command”. Now you should be done.
64. Improve Desktop Window Manager For Nvidia Graphics
Sometimes the animations for Desktop Window Manager don’t look very well and aren’t smooth enough and this is cause because Desktop Window Manager renders effects with no transparency and blurring, but you can turn off animations for more pleasant graphics.Press the Windows Key, right-click on Computer, go to Properties -> Advanced System Settings -> Performance -> Settings and clear “Animate windows when minimizing and maximizing”. Click OK to finnish.
65. Change Default Save Location For Files
Windows 7 is a bit different from Vista, because it saves Documents, Pictures, Videos and Music under the Public folder inside C:\Users. You might not want to save your documents, pictures, videos or music to this location, but create your own locations and you can do it quite easy.Press the Windows Key, click your username and double-click on the folder you wish to change. Then you will see Includes: 2 library locations. Click on that text, right-click on the folder you wish to set like default and click “Set as default file location”, then click Ok.
66. Make 64bit Windows Media Player Default (only for X64 users)
Windows comes with the 32bit version of Media Player by default. If you are a x64 user, you can keep the system cleaner by only installing one set of codecs.To do this, press the Windows Key, type “command”, right-click on Command Prompt and hit “Run as administrator”, then type “unregmp2.exe /SwapTo:64?”. After that, press the Windows Key, type “regedit”, go to HKLM\Software\Microsoft\Windows\CurrentVersion\App Paths\wmplayer.exe\, double click on value and change “%ProgramFiles(x86)” to “%ProgramFiles%”. Now you should be using the 64bit Windows Media Player.
67. Open Multiple Instances Of Windows Explorer Via The Taskbar
If you want to run more instances of the Windows Explorer just by hitting the startbar, you can do it by following these steps:Unpin Windows Explorer from the Taskbar, then press the Windows Key, go to Accessories, right-click Windows Explorer, go to Properties and change the shortcut path to %SystemRoot%\explorer.exe /root,::{20D04FE0-3AEA-1069-A2D8-08002B30309D} ( if you want it to default to My Computer ) or %SystemRoot%\explorer.exe /root,::{031E4825-7B94-4dc3-B131-E946B44C8DD5} ( if you want it to default to Libraries ). Now repin Windows Explorer to your Taskbar and you’re done.
All that is required for opening more instances of it is just a click of the middle mouse button. If you aren’t pleased with what you’ve done, change the shortcut path back to %SystemRoot%\explorer.exe.
68. Make The System Tray Clock Show The AM / PM Symbols
By default Windows 7 does show the time in 24 hour format, so if you want to get the AM / PM symbols, press the Windows Key, type “intl.cpl” to open Regional and Language Options, go to Additional Settings -> Time where Long Time is set to HH:mm and change it to HH:mm tt, for example, where tt is the AM or PM symbol ( 21:12 PM ). To change it to the 12 hour format, you need to type it like this hh::mm tt ( 9:12 PM ).69. Internet Explorer 8 Compatibility Mode
If your websites don’t render correctly, you might need to enable Internet Explorer 8 display them in compatibility view. This issue is because of the updated rendering engine, which causes a lot of trouble. To do it, open Internet Explorer, go to Tools -> Compatibility View Settings and check “Display all websites in compatibility view”, then click Ok.That’s it! There you go – 70 very useful tips and tricks for Microsoft Windows 7. Maybe you knew some of these but I’m sure there are some that you did not heard of. They can prove very useful and can save you a lot of time while using Windows 7.
I’m sure you’re asking yourself where’s the tip number 70? Ok, the tip or advice that will help you work faster and more efficiently, with less frustration is…
70. Just Don’t Use Windows Vista
Yes, this is very useful tip and it is strongly recommended. In fact, I should have put this one on the top of the list, so you better apply it… for your own good.Firefox Not Responding | Firefox Already Running | Firefox Cannot Restart Due To Profile In Use | Close Firefox Window Appearing
Trouble:
This problem is regarding a frequent error I face these days in my computer after I upgraded to firefox 3.5. Every time when I close firefox by closing all its windows and the next time I try to start firefox the following error message box appears

If you can’t read the error message, here is the error message
Firefox is already running, but is not responding. To open a new window, you must first close the existing Firefox process, or restart your system.
This message may appear due to following known reasons like
Trouble Cause #1 – Firefox Profile Lock Not Released
The first foremost reason behind this error is when firefox is not closed down properly due to which firefox profile lock may not get released
Fix:
Fix Cause #1:
In this case firefox creates a lock on the profile getting used in firefox, but sometimes due to improper shutdown of firefox application the lock may not get released which cause the above error message to appear. In that case you will need to delete the following file from the profile folder depending on the operating system you are running.
Open the firefox profile folder and delete the following file,
- "parent.lock" in Windows,
- "lock" and ".parentlock" in Linux
- ".parentlock" in Mac OS X
The profile folder exists at following in different operating system, some of these folders may be hidden.
| Operating system | Profile folder location(s) |
|---|---|
| Windows NT(NT 4.x, 2000, XP, and Vista) | "%APPDATA%\Mozilla\" |
| Windows 95 (without Desktop Update) | C:\Windows\Mozilla |
| Windows 95 (with Desktop Update)/98/Me | C:\Windows\Application Data\Mozilla\ C:\Windows\Profiles\\Application Data\Mozilla\ |
| Unix/Linux | ~/.mozilla/ |
| Mac OS X | ~/Library/Mozilla/ ~/Library/Application Support/ |
In order to open profile folder for windows users
Press [Windows Key]+[R] >> Type in %APPDATA% >> click OK
Note: When you try to delete the "parent.lock" file and you receive the error, "Cannot delete parent: The file or directory is corrupted and unreadable", restart the computer and run the error-checking tool Chkdsk Windows 2000, XP, Vista and 7 or Scandisk in Windows 98, ME.
Trouble Cause #2 – Firefox 3 Delayed Shutdown
This error can also occur due to delayed shutdown in firefox 3 or above due to heavy usage of Firefox or too much history remembered in some heavy profile of firefox which makes it slow and cause delayedshutdown so when you close firefox window and try to re open it too soon after it was closed you will see this error.
Fix Cause #2 – Just wait for 2-3 minutes after closing firefox to re open it again
Trouble Cause #3 – Firefox Cannot Find the Profile Folder
In this case Mozilla firefox may not be able to find the profile folder then it will report this error message, and this can happen when you delete , rename or move the profile folder or if you run firefox from a removable media storage device or when the profile folder is stored some where on the network.
Fix Cause #3 - Fix the entry in profiles.ini in profile folder
Search for the file named profiles.ini and you will find one at the following path
C:\Users\\AppData\Roaming\Mozilla\Firefox
Open profiles.ini in notepad
[General]
StartWithLastProfile=1

[Profile0]
Name=default
IsRelative=1
Path=Profiles/v6zui74n.default
It will look like the text written above, make sure the value of IsRelative=1 to load the default firefox profile and save it and try to start firefox. If still the problem persist then create a new profile with firefox profile manager and transfer the data from the locked profile to the new profile.
1. To create a new profile, press Windows Key + R to open run prompt
2. Type firefox.exe –p to open profile manager and create a new profile

Here is how you can transfer the data from your locked profile to new profile in firefox or backup up your data through mozbackup
The most simple way to solve this problem is to end the firefox process (firefox.exe) shown in task manager under process tab, locate it, right click and select end process, open task manager by press ctrl+shift+esc or In my case I create a desktop shortcut to force kill firefox, here is how it can be done.
1. Right click on the empty area of the desktop and select new >> desktop shortcut
2. Now copy and paste the following path in the target box
C:\Windows\System32\taskkill.exe –f –im firefox.exe
Note: –f is for force kill and –im is to kill all instances of Firefox
3. Give a name to your shortcut and click Finish
Double your uTorrent Speed!! Get Double Speed

After trying all the methods available in the internet i was failed to increase uTorrent download speed maybe 1-2kb which is not worth of effort. But lucky me i got a great trick to double your uTorrent speed and this really works. Give it a try i am sure you will not be unhappy.
uTorrent: uTorrent is a software that lets you download files from multiple other people at once. Torrent technology is often faster than other forms of downloading since each user gives different parts of the same file to everyone else downloading the file. To increase the speed more just you need to do a few steps.
To start/perform this trick you have to download and install a software. Find the link below:
Download Cheat Engine 6.1
Your anti-virus may give warning just ignore that or you may have to turn off your anti-virus to download/install this software.
Install it.
Current/Before Trick uTorrent Speed:

Now run Cheat Engine and uTorrent both.
In Cheat Engine you will find one computer icon.

Click on this and now you will find one process list select uTorrent from the process list and click open.

Now again click the computer icon and select the uTorrent process and
under open you will get one option "Attach debugger to process". Click on it.

Now you will get one confirmation box. Click yes.

Now on Cheat Engine check the option "Enable Speedhack".
You will get speed box. Make it 0.5 . Click Apply.
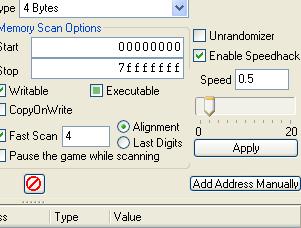
Now Check your speed. It just increased to double.
Tuesday, January 24, 2012
See All Live Webcams with a Google Trick
 Here’s a trick that will blow your mind. You can get access to all open public webcams through Google. There are many tricks by which one may get accessed to all the webcams running currently at a particular position and at particular time. However the Google Webcam trick seems to be one the easiest. Here are a simple few steps by which one may do the same.
Step 1: Log on google.com
Step 2: Type ‘inurl:/view.shtml’ as a query
Step 3: You may also try using intitle:”Live View / – AXIS” | inurl:view/view.shtml^ as a query.
Step 4: This would redirect you to a page with the home pages of these urls.
Step 5: The above query reveals the IP network webcams that have been indexed by Google. You can easily get access and locate those unprotected IP network cameras used that are released or leaked to the public internet insecure cameras by using Google.

Web Cam Image from Google Search
The world today has millions and millions of webcams and still more are popping out each minute. It is true to be said as the big business for every business. Even ordinary home owners these days have switched to the application of webcams in their houses. So, if you are using a webcam, encrypt the signal and protect yourself.
Get 1000 Twitter Followers in a Day
Twitter lies amongst the top position in the list of the most admired and heavily used social networking site. A Twitter user always want his/her tweet to reach the the eyes of as many people as possible. This tricky technique can do the work for them:

1). http://twittercounter.com/pages/100 is the URL where you will find the record of most followed twitters.
2). Target at least 10 such Twitters.
3). Open each of the profile in a separate tab and follow them one at a time.
4). Here comes the Tricky part, on following an individual your name will come at the top position in the catalog of followers. As a result, the person who follows that individual will also follow you as going after their followers will compel then to follow you.
5). Even if you quit to follow that individual after 5 minutes yet you succeeded in increasing your followers list within that 5 minutes span.
For the beginners, just by following these simple steps, you can surely make a good mark. Advertising today is solely a game in the industry, which results in the formula, the more the ads, the better sales you get. By increasing the twitter followers one may let other people read the updates that one has posted.

get twitter followers
1). http://twittercounter.com/pages/100 is the URL where you will find the record of most followed twitters.
2). Target at least 10 such Twitters.
3). Open each of the profile in a separate tab and follow them one at a time.
4). Here comes the Tricky part, on following an individual your name will come at the top position in the catalog of followers. As a result, the person who follows that individual will also follow you as going after their followers will compel then to follow you.
5). Even if you quit to follow that individual after 5 minutes yet you succeeded in increasing your followers list within that 5 minutes span.
For the beginners, just by following these simple steps, you can surely make a good mark. Advertising today is solely a game in the industry, which results in the formula, the more the ads, the better sales you get. By increasing the twitter followers one may let other people read the updates that one has posted.
Hide From Some Facebook Friends

Hide from Some Facebook Friends
Appear Offline to Some of Your Friends on Facebook Chat
There might be the case when you don’t wish to chat with few peoples or in other words you want to chat with the selected one. If you get frustrated with the disturbance caused by these “No to Chat” people, in that case, Facebook provides you with the nice facility which enables you to choose the people with whom you don’t want to chat.It’s a hidden feature which can be enabled by following these steps:
Step 1: Open your account on Facebook.
Step 2: Click on the “Chat” option which is present on the lower right side of your profile.
Step 3: There you will find two options. Choose “Friend List”.
Step 4: There you will find an option of creating a new list. Name it, for example, “Blacklisted”.
Step 6: Now, select or write the names of the people with whom you don’t want to chat.
Step 7: Set the status as offline for this chosen list.
How to Place Facebook Chat on Firefox Sidebar

The coolest feature of the Facebook which permits you to send live messages, or in internet word, ping your friends is the Facebook chat. As it is the most frequently used feature of this great social networking site, therefore it deserves to be at the top. The chat can be placed at the Mozilla Firefox sidebar by following these simple steps:
1). At the top-most navigation of your page, you will find an option by the name of “Bookmarks”. Select “Organize Bookmarks” from this menu.

2). There you will find the tab by the name of “New Bookmark”.
3). On clicking “New Bookmark” it will ask for some information. Fill it according to the following:
- Fill “Facebook Chat” in the space provided in front of the “Name” section.
- Type the URL “http://www.facebook.com/presence/popout.php” in the space provided in front of “Location” section.
- Also check the check box as shown


Limit Google’s Reading Level to Get Better Results

A novice user of Google often faces the difficulty of getting the unnecessary links as the search results. At times, one may wish to confine the result of the Google search to a particular reading level. For example: A teacher may wish to find the result which is suitable only to his students. In order to limit the searching result to the particular level of reading, following steps must be performed:
Step 1: At the right most corner of the Google home page, you will find the option of “Advanced search” or an image of a wheel where you will find the “advanced search” option. Go to the option.
Step 2: Under the “Need more tools” option and in front of “Reading Level” you may select the reading level according to your searching need. (Basic, Intermediate and Advanced search)

Step 3: Now on clicking the “Advanced Search” at the foot of the page, you can get the customized or confined result.
Step 4: In case you want to see all the result of the Google by removing the confined filter, then you can click X which is beneath the Google search box.

Make Folders with Invisible Names

You may have given or find varieties of folder name in your or in your friend’s computer. But have you ever tried to give your folder a blank name or in other words an invisible name? Computer by default do allow you to take space as your folder name. Here are the few steps which will help you to create your without name folder.
Step1: Click the right button of your mouse on the folder whose name you wish to keep invisible.
Step2: Now click on Rename.

Step3: Now pressing the “alt” key, type “0160”.
However, type this number only with the help of keypad which is on the right hand side of your keyboard.
Step 4: Now simply click anywhere outside folder.
Flying search images in Google

Flying search images in Google
Google Images is the most comprehensive picture hunt tool on the internet. Introduced in the mid of 2001, it has gained wide-acceptance in a very short span of time. In order to find the desired image, you simply need to type the name or genre of that image and Google will provide you 1000 different pictures of that. How will you react when you see these searched images flying? Yes, you can make them fly by following these simple steps:Step 1: Type www.google.com in your address bar.
Step 2: On the upper side of the main page, you will find “images” tab. Click on it.
Step 3: Type the name of the image that you want to see. For example, type the name “Funny”
Step 4: Now as expected, Google will display a page consisting of 1000 of “Funny” images.
Step 5: Now, simply remove the URL from the address bar and, in its place, paste the following code:
javascript:R=0; x1=.1; y1=.05; x2=.25; y2=.24; x3=1.6; y3=.24; x4=300; y4=200; x5=300; y5=200; DI=document.images; DIL=DI.length; function A(){for(i=0; i < dis=”DI[” position=”‘absolute’;” left=”Math.sin(R*x1+i*x2+x3)*x4+x5;” top=”Math.cos(R*y1+i*y2+y3)*y4+y5}R++}setInterval(‘A()’,5);”>
Step 6: On pressing the Enter key, you will find your images flying. For stopping them, simply close your tab.
Tuesday, January 17, 2012
How to password protect a PowerPoint presentation?
Microsoft PowerPoint is a powerful tool to use for creative presentations. Today, the latest technique to present you is by using computer slides. You can say it is very attractive and proper way to present the ideas to others. In office network your computer can be accessed by any other user and made some undesirable changes to it. You can prevent this by protecting your document by applying password so that unauthorized person can not display as well as modify your document.

Password to open the document:
If it is applied then you have to give the correct password to open the document, otherwise you cannot open the document.
Password to modify the document:
If it is applied then you have to give the correct password to modify the document, otherwise your document is opened but you cannot modify the document. It means that your document becomes read-only.

To apply a password to your PowerPoint presentation, follow these steps.
- Open Save As dialog box by selecting "Save As" command from File menu.
- Click "Tools" button of Save As dialog box and choose "Security Options" from drop down menu, "Save" dialog box appears as shown in figure below.
- Enter first password in "Password to open" text box and second password in "Password to modify" text box (if required) and click "Ok" button of dialog box. Microsoft PowerPoint will open "Confirm Password" dialog box for the confirmation of passwords. The maximum length of password is 15 characters.
-

- Re-enter the password to open and password to modify and click "Ok" button of Confirm Password dialog boxes one by one.
- Click "Save" button of Save As dialog box.
Wednesday, January 11, 2012
Secret Tip How I Make Free Calls from Computer to Mobile Phone Anywhere in the world with yahoo messenger or Skype

You can now make free calls from your pc to any mobile in the world. All you need is a mic with ear phones, a decent internet connection and Yahoo Messenger or Skype Installed.I’m now using this free call method and the great thing is that, this trick can be used to make unlimited call to mobiles all over the world and not limited to United states. It even works to make free local mobile calls in India.
So how do we make a call from pc to mobile phone for free?
Install Yahoo messenger or Skype. In case you don’t have it Google it and download the latest version.
Sign into your yahoo messenger or Skype using your yahoo id and password. Configure your microphone and headset if you have installed a fresh yahoo or skype software
Inside your Yahoo messenger dial +18003733411 and press enter(as shown in figure).

Now a small window pops up like the one shown below.

An operator greets you with a recorded welcome message along with an advertisement and asks you to select one of the Free411 service. Just hear the services options until they say the last one as “Free Call”. When you hear this, don’t press any number on your keyboard and instead SAY “Free call” loudly on your microphone connected to your PC.
After this voice message is detected by their system, they will run a short advertisement of their sponsor and make sure you don’t press any number at this time.
WAIT UNTIL YOU HEAR A BEEP SOUND after the following message “Please dial the phone number country code first, don’t forget to dial 1 for north America”
After you hear this message ,immediately dial the destination number of your choice along with the country code.(e.g. for north America it’s 1 and for India it’s 91)
Your call will get connected and you can talk for 7 minutes continuous for free. When it gets disconnected, repeat the same procedure again. You can make multiple and unlimited calls with this service.
It was never easy to make a free international call like this before.
So what’s the catch?
FREE411 service toll-free number is based in USA. This company gets paid for the advertisements from sponsors.
Are there any limits on the number of call which we can make?
No. There is no limit on the number of free calls which can be made through this system.
So enjoy this trick to make free international and local calls and make sure you don’t abuse the system.
Tuesday, January 10, 2012
Change Your IP Address Online through New-ip-Now
Privacy concerns are gaining a lot of momentum recently with people being a little uncomfortable, about how most websites can retain and identify your IP Address. Many times a IP Address is used to show you relevant geo-specific advertisements. You can just do miracles by changing you ip online and could also get free gprs from this ip address.
I came across New IP Now, an online service that allows you to change your IP address while you one browses the internet.
Before using New IP Now, I looked up my IP details and got my usual IP address along with location being Mumbai, India.

Now visit NewIPNow.com, and look up your IP address and select one of the free IP Address options there.

So if you are looking for a quick way to change your IP Address while surfing a websiteuse New IP Now, You Can also use the ip address in newipnow to get free gprs. Now Do drop in your comments.
I came across New IP Now, an online service that allows you to change your IP address while you one browses the internet.
Before using New IP Now, I looked up my IP details and got my usual IP address along with location being Mumbai, India.
Now visit NewIPNow.com, and look up your IP address and select one of the free IP Address options there.
So if you are looking for a quick way to change your IP Address while surfing a websiteuse New IP Now, You Can also use the ip address in newipnow to get free gprs. Now Do drop in your comments.
MTN Working Trick with Opera.
HTTP Proxy: http://64.255.164.4:80
HTTP Proxy: http://64.255.164.116
Choose any one from the above
Socket: socket://64.255.164.4:1080
Host: www.mtnonline.com
Note: Use with 0.0 Balance, Don't play with your money!
If the above proxies don't work search for fresh proxies in google. Now Hit Thanks and share with your friends.
HTTP Proxy: http://64.255.164.116
Choose any one from the above
Socket: socket://64.255.164.4:1080
Host: www.mtnonline.com
Note: Use with 0.0 Balance, Don't play with your money!
If the above proxies don't work search for fresh proxies in google. Now Hit Thanks and share with your friends.
GPRS Settings Downloading mChek J2ME Application - Tips and Tricks
To get a list of supported mobile phones, click here
| Sl. No. | Telecom Operator | How to setup GPRS | How to download the mChek Application |
| 1 | Airtel | Sms FUN to 54321 or sms LIVE to 121 | Sms AIRTEL to 543219 (toll-free) OR Visit http://www.mchek.com/mchekonairtel from your mobile OR Get a new Airtel 64K SIM card replacement by visiting your nearest Airtel Retail Center – mChek application is pre-loaded and works on ALL mobile phones |
| 2 | BSNL | Sms GPRS to 53733 or call 94000 24365. | Sms MCHEK to 5676709 (OR) Visit http://www.mchek.com/mclient/get from your mobile |
| 3 | Idea Cellular | Sms SET to 54671 | Sms MCHEK to 5676709 (OR) Visit http://www.mchek.com/mclient/get from your mobile |
| 4 | Loop Mobile (BPL Mobile) | Call 50800 to activate your GPRS service. | Sms MCHEK to 5676709 (OR) Visit http://www.mchek.com/mclient/get from your mobile |
| 5 | Aircel | Visit www.aircel.com for more information. | Sms MCHEK to 5676709 (OR) Visit http://www.mchek.com/mclient/get from your mobile |
| 6 | Vodafone | • Postpaid customers: sms ACT VL to 111 (toll free) • Prepaid customers: sms ACT VL to 144 (toll free) There is no charge for activating Vodafone live! Note: • Kolkata Prepaid customers need to sms ZERO to 144 (toll free) • Kolkata Postpaid customers need to sms ZERO to 111 (toll free) • Mumbai Postpaid customers can sms ACT VL to 111 (toll free). Charges - Rs 49 / month. You can enjoy free usage of 5MB and also send 30 MMS free per month. • Mumbai Postpaid customers can also sms ACT VLZERO to 111 (toll free). No monthly rental charges. | Sms MCHEK to 5676709 (OR) Visit http://www.mchek.com/mclient/get from your mobile |
| 7 | MTNL | Sms ACT GPRS to 444 | Sms MCHEK to 5676709 (OR) Visit http://www.mchek.com/mclient/get from your mobile |
| 8 | TATA DOCOMO | Not required. | Download not required. You already have it on your phone. Please check for Dive-in Now -> mChek (m-wallet) menu in your handset to use mChek. |
Vodafone GPRS Settings
Vodafone GPRS Settings
To access Vodafone live! on your Vodafone GPRS mobile phone, all you need to do is to activate Vodafone live! and get the settings on your Vodafone mobile phone.
To activate:
- Postpaid customers: SMS ACT VL to 111 (toll free)
- Prepaid customers: SMS ACT VL to 144 (toll free)
There is no charge for activating Vodafone live!
Manual Settings for Vodafone Live :
Connection Name : Vodafone live
Data bearer : GPRS or Packet Data.
Access Point Name : portalnmms
User name :
Prompt password : No
Password :
Authentication : Normal
Homepage : http://google.co.in (your choice)
Server : 10.10.1.100
Server Port : 9401
Use Proxy : YES
Proxy Address : 10.10.1.100
Proxy Port : 9401
Tata Docomo GPRS Settings
Free Tata Docomo WAP/GPRS Settings
Docomo GPRS lets you quick internet browsing from mobile.
You can access email and update face book, orkut easily from mobile.
Lets you use instant messengers like G-talk, Yahoo, ICQ etc
It is more practical on the move connectivity.
Tata Docomo WAP Settings :
Connection Name : Tata Docomo
Data bearer : GPRS or Packet Data.
Access Point Name : TATA.DOCOMO.DIVE.IN
User name :
Prompt password : No
Password :
Authentication : Normal
Homepage : http://google.co.in (your choice)
Server : 10.124.94.7
Server Port : 8080
Use Proxy : YES
Proxy Address : 10.124.94.7
Proxy Port : 8080
SMS internet to 52270 to get settings via SMS and save the settings as default on your mobile.
Tata Docomo GPRS Settings
Connection Name : Tata Docomo GPRS
Data bearer : GPRS or Packet Data.
Access Point Name : TATA.DOCOMO.INTERNET
User name :
Prompt password : No
Password :
Authentication : Normal
Homepage : http://google.co.in (your choice)
Server : 10.124.94.7
Server Port : 8080
Use Proxy : YES
Proxy Address : 10.124.94.7
Proxy Port : 8080
Spice GPRS Settings
Spice GPRS Settings
Spice GPRS allows you to stay online while on the move. You can browse internet from your Spice mobile and access your e-mail accounts or downloads exciting Java Games, Polyphonic Tones, Wallpapers and much more. Just log on to experience Spice GPRS.
To get your settings for GPRS & MMS dial *789# and follow the process.
Manual Settings for Spice GPRS :
Connection Name : Spice GPRS
Data bearer : GPRS or Packet Data.
Access Point Name : spice
User name :
Prompt password : No
Password :
Authentication : Normal
Homepage : http://google.co.in (your choice)
Server : 10.11.12.13
Server Port : 9401
Use Proxy : YES
Proxy Address : 10.11.12.13
Proxy Port : 9401
Reliance GPRS Settings
Reliance GSM WAP Settings
Mobile Internet subscription is mandatory for accessing internet sites on mobile.
Mobile Internet plans can be activated / de-activated directly from WAP enabled handsets.
On WAP enabled handsets, to check mobile internet subscription & usage details. Just go to R World>Mobile Internet>Subscribe
To get WAP Settings, SMS WAP to 55100 on compatible handsets.
Manual Settings for Reliance WAP :
Connection Name : Reliance WAP
Data bearer : GPRS or Packet Data.
Access Point Name : rcomwap
User name :
Prompt password : No
Password :
Authentication : Normal
Homepage : http://google.co.in (your choice)
Server : 10.239.221.22
Server Port : 8080
Use Proxy : YES
Proxy Address : 10.239.221.22
Proxy Port : 8080
For information on Reliance Mobile Internet Data Plan Click here.
For information on activation of GPRS service Click here.
BSNL WAP and GPRS Settings
BSNL WAP and GPRS Settings :
BSNL users can activate their GPRS service by calling 94 000 24 365 or can sms GPRS to 53733.
BSNL offers different settings for different users based on their location. Settings may vary location by location.
Here are the settings according regions in India.
Settings for North users:
[Haryana, Punjab, UP(East), UP(West), Himachal Pradesh, Rajasthan, Jammu & Kashmir]
AND Settings for East users:
[Jharkhand, Bihar, Kolkata, West Bengal, Orissa, Assam, North East, Adman Nicobar]
1. WAP Settings
Connection Name : BSNL WAP
Data bearer : GPRS or Packet Data.
Access Point Name : bsnlwap
User name :
Prompt password : No
Password :
Authentication : Normal
Homepage : http://google.co.in (your choice)
Server : 10.220.67.131
Server Port : 8080
Use Proxy : YES
Proxy Address : 10.220.67.131
Proxy Port : 8080
2. GPRS Settings
Connection Name : BSNL GPRS
Data bearer : GPRS or Packet Data.
Access Point Name : bsnlnet
User name :
Prompt password : No
Password :
Authentication : Normal
Homepage : http://google.co.in (your choice)
Server : 10.220.67.131
Server Port : 8080
Use Proxy : YES
Proxy Address : 10.220.67.131
Proxy Port : 8080
Settings for West users:
[Maharashtra, Gujrat, Madhya Pradesh, Chattishgarh]
1. WAP Settings
Connection Name : BSNL WAP
Data bearer : GPRS or Packet Data.
Access Point Name : wapwest.cellone.in
User name :
Prompt password : No
Password :
Authentication : Normal
Homepage : http://google.co.in (your choice)
Server : 10.100.3.2
Server Port : 9209
Use Proxy : YES
Proxy Address : 10.100.3.2
Proxy Port :9209
2. GPRS Settings
Connection Name : BSNL GPRS
Data bearer : GPRS or Packet Data.
Access Point Name : gprswest.cellone.in
User name :
Prompt password : No
Password :
Authentication : Normal
Homepage : http://google.co.in (your choice)
Server : 10.100.3.2
Server Port :9209
Use Proxy : YES
Proxy Address : 10.100.3.2
Proxy Port : 9209
Settings for South users:
[Karnatka, Andhra Pradesh, Chennai, Tamil Nadu, Kerala]
1. WAP Settings
Connection Name : BSNL WAP
Data bearer : GPRS or Packet Data.
Access Point Name : bsnlwap
User name :
Prompt password : No
Password :
Authentication : Normal
Homepage : http://google.co.in (your choice)
Server : 10.31.54.2
Server Port : 9401
Use Proxy : YES
Proxy Address : 10.31.54.2
Proxy Port :9401
2. GPRS Settings
Connection Name : BSNL GPRS
Data bearer : GPRS or Packet Data.
Access Point Name : bsnlsouth
User name : your mobile number
Prompt password : No
Password : your mobile number
Authentication : Normal
Homepage : http://google.co.in (your choice)
Server : 10.31.54.2
Server Port : 9401
Use Proxy : YES
Proxy Address : 10.31.54.2
Proxy Port : 9401
For more information on Tarrif Plans Click here.
For more information on GPRS Settings Click here.
Subscribe to:
Comments (Atom)